Sketch up – SketchUp, the wildly popular 3D modeling software, opens doors to a world of creative possibilities. Whether you’re crafting intricate architectural designs, whipping up product prototypes, or just messing around with cool 3D shapes, SketchUp’s intuitive interface and powerful tools make it surprisingly accessible, even for total newbies. This guide dives into the core functionalities, explores essential extensions, and shows you how to leverage SketchUp for various design disciplines.
Get ready to unleash your inner digital architect!
From the basics of navigating the interface and mastering the Push/Pull tool to exploring advanced techniques like creating custom materials and integrating SketchUp with other software, we’ll cover it all. We’ll also delve into specific applications, like architectural, product, and interior design, providing practical examples and step-by-step guides to help you build your skills and confidence. So grab your mouse, fire up SketchUp, and let’s get building!
SketchUp’s Interface and Functionality
SketchUp’s intuitive interface and powerful tools make it a popular choice for 3D modeling, from architectural visualizations to product design. Its ease of use belies its capabilities, allowing both beginners and experienced modelers to create impressive results. This section will delve into the key components of the SketchUp interface and explore its core functionality.
SketchUp Interface Components
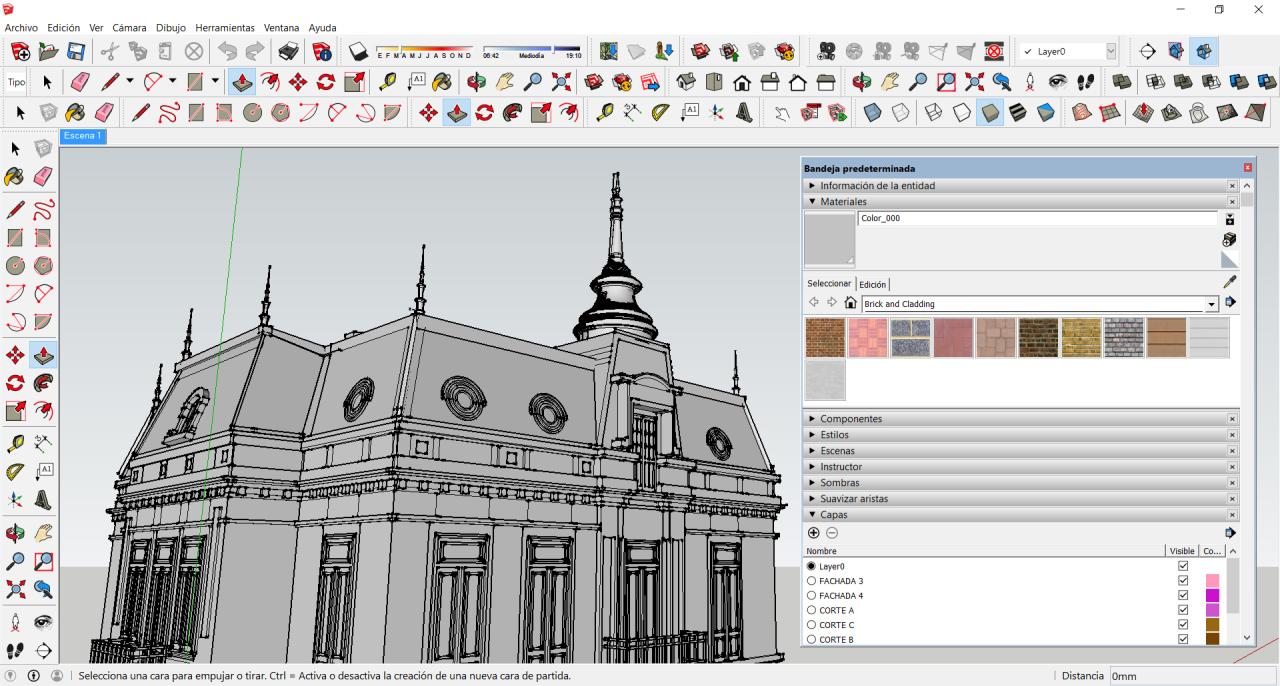
The SketchUp interface is generally divided into several key areas. The main window displays your model. Toolbars, usually located along the top and sides, provide quick access to essential modeling tools. The status bar at the bottom shows information about your current actions and selections. The “Entities” window (often docked on the left or right) lists all the objects in your model, allowing for easy selection and manipulation.
Finally, the “Materials” window provides a palette of textures and colors to apply to your model. Understanding these areas is crucial for efficient modeling.
Creating a Basic 3D Model in SketchUp
Building even a simple 3D model in SketchUp involves a straightforward process. First, you’ll start by drawing basic shapes, like rectangles or circles, using the appropriate tools from the toolbar. These shapes form the foundation of your model. Then, you can use tools like “Push/Pull” to extrude these shapes into three dimensions, adding depth and volume. Finally, you’ll refine your model by adding details, manipulating shapes, and applying materials to create a visually appealing and realistic representation.
For instance, you might start with a rectangular base for a house, then use Push/Pull to create the walls, and then add windows and doors.
SketchUp Modeling Tools
SketchUp boasts a variety of tools tailored to different modeling tasks. The Line tool allows you to draw lines, the Rectangle tool creates rectangles, and the Circle tool draws circles. The Arc tool is used to draw arcs and curves. The Move tool lets you reposition objects, while the Rotate tool spins them. The Scale tool adjusts the size of objects.
The Push/Pull tool, as mentioned before, is incredibly versatile, allowing you to extrude faces and create 3D forms from 2D shapes. The Eraser tool removes unwanted lines or surfaces. Mastering these tools is key to efficient and effective modeling.
Using the Push/Pull Tool
The Push/Pull tool is arguably SketchUp’s most powerful and versatile feature. Here’s a step-by-step guide:
- Select the Push/Pull tool from the toolbar (it usually looks like a hand pushing a surface).
- Select the face (the flat surface) you want to extrude.
- Click and drag the mouse to push or pull the face. The direction and distance of your mouse movement determine the extrusion’s direction and length.
- Release the mouse button to finalize the extrusion.
This simple process allows you to create complex shapes from basic 2D forms. For example, you could start with a square and use Push/Pull to create a cube, or a circle to create a cylinder.
Comparison of SketchUp Modeling Tools with Other Software
The following table compares SketchUp’s core modeling tools with those found in other popular 3D modeling software packages. Note that feature sets and functionalities can vary greatly depending on the specific version and license of the software.
| Tool | SketchUp | Blender | AutoCAD |
|---|---|---|---|
| Line Tool | Simple, intuitive line creation | Similar functionality, part of a broader suite | Precise line creation with extensive options |
| Extrusion Tool (Push/Pull equivalent) | Intuitive, direct manipulation | Extrude function, often requiring more steps | Extrude command with many parameters |
| Surface Modeling Tools | Relatively limited compared to others | Extensive and powerful surface modeling tools | Powerful surface modeling capabilities with NURBS |
| Boolean Operations | Basic union, subtraction, and intersection | Advanced boolean operations with modifiers | Powerful boolean operations for complex modeling |
SketchUp Extensions and Plugins
SketchUp’s core functionality is already pretty powerful, but the real magic happens when you start exploring its vast library of extensions and plugins. These add-ons dramatically expand SketchUp’s capabilities, allowing you to tackle complex tasks, automate workflows, and integrate with other design software. Think of them as power-ups for your modeling experience. They range from simple tools to highly specialized programs that can transform your workflow.
Five Popular SketchUp Extensions and Their Functionalities
Extensions significantly enhance SketchUp’s capabilities, offering specialized tools and features not included in the base program. Here are five popular examples, showcasing the diversity available:
- FredoScale: This extension simplifies the scaling of components and groups, offering more precise control and efficiency than the default SketchUp scaling tools. It’s incredibly useful for accurately resizing objects without distorting proportions.
- Trimble Connect: This is a cloud-based platform that integrates directly with SketchUp, allowing for easy file sharing, collaboration, and version control. It’s invaluable for teamwork on larger projects.
- SketchUp Style Builder: This extension simplifies the creation and management of materials and styles. It makes it easy to create custom looks and apply them consistently throughout your models, saving a significant amount of time and effort.
- Curviloft: Designed for creating complex curved surfaces, Curviloft streamlines the process of generating lofted surfaces from curves and sections. This is particularly useful for architectural and industrial design projects.
- TIG: This extension is a powerhouse for creating complex and realistic textures. It allows for procedural texturing, offering unparalleled control over surface details and appearance.
Benefits and Drawbacks of Using Extensions
Using extensions offers many advantages, but it’s important to weigh the pros and cons.
Benefits: Increased efficiency, expanded functionality, specialized tools for specific tasks, integration with other software, and access to a wider community of users and developers.
Drawbacks: Potential for compatibility issues, increased system resource consumption, reliance on third-party developers for updates and support, and the learning curve associated with mastering new tools.
Installing and Managing SketchUp Extensions
Installing extensions is generally straightforward. SketchUp’s Extension Warehouse is a central repository where you can browse, download, and install extensions directly within the SketchUp interface. The process typically involves locating the desired extension, clicking an install button, and restarting SketchUp. Managing extensions involves enabling or disabling them through SketchUp’s Extension Manager, which provides a centralized location to control which extensions are active in your current session.
Uninstalling extensions is equally simple, often achieved through the Extension Manager.
Feature Comparison: Two Architectural Visualization Extensions
Let’s compare two popular extensions for architectural visualization: V-Ray and Thea Render.
Both extensions provide advanced rendering capabilities, but they differ in their strengths. V-Ray is known for its speed and versatility, offering a wide array of rendering options and a robust material system. Thea Render, on the other hand, often produces images with a more physically accurate and photorealistic look, though it might require more processing time.
Ultimately, the choice depends on the specific needs of the project and the user’s priorities. A project requiring fast turnaround might favor V-Ray, while a project emphasizing photorealism might benefit from Thea Render.
Workflow Incorporating Three Extensions for a Specific Modeling Task
Let’s design a workflow for creating a detailed architectural model of a modern house, using three extensions: FredoScale, SketchUp Style Builder, and Trimble Connect.
Step 1: Modeling the house. Create the basic geometry of the house using SketchUp’s native tools.
Step 2: Scaling and Detailing. Use FredoScale to accurately resize and position components such as windows, doors, and furniture. This ensures precise proportions and avoids distortion.
Step 3: Applying Materials and Styles. Use SketchUp Style Builder to create and apply custom materials and styles to the model, providing a realistic representation of the house’s exterior and interior finishes.
Step 4: Collaboration and Sharing. Use Trimble Connect to share the model with collaborators, track changes, and manage different versions of the design.
SketchUp for Architectural Design

SketchUp’s intuitive interface and powerful modeling tools make it a go-to program for architects of all levels, from students sketching initial concepts to seasoned professionals creating detailed construction documents. Its flexibility allows for quick iteration and experimentation, crucial in the design process. This section dives into leveraging SketchUp’s capabilities specifically for architectural design.
Creating a Basic House Model in SketchUp
Building a simple house model in SketchUp is a great way to familiarize yourself with the software’s core functions. Begin by drawing the foundation using the rectangle tool. Extrude this rectangle to create the foundation’s height. Then, use the push/pull tool to add walls, creating the basic shell of the house. Remember to use layers to organize your model effectively.
Next, add doors and windows using the appropriate tools and techniques, remembering to subtract the volume for accurate representation. Finally, add a roof using the roof tool or by manually creating planes and connecting them to the walls. This process allows for a fundamental understanding of the software’s basic tools and capabilities before progressing to more complex structures.
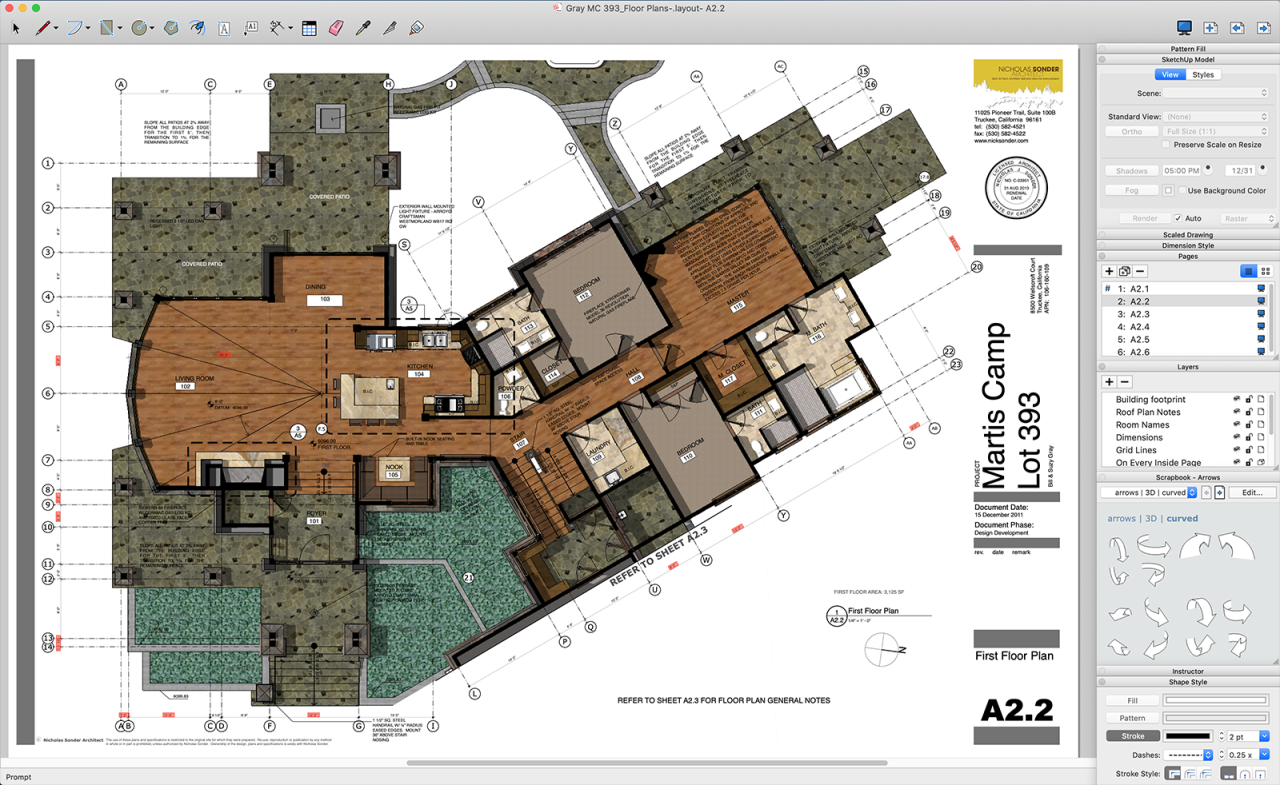
Designing Floor Plans and Elevations
SketchUp facilitates the creation of accurate floor plans and elevations. Begin by creating a detailed floor plan using the rectangle, line, and arc tools, carefully defining the rooms and spaces within the building. Use components to represent repetitive elements like doors, windows, and fixtures, enhancing efficiency and consistency. To generate elevations, employ the section plane tool to cut through the 3D model at desired locations, revealing the vertical planes.
These views can then be styled and labeled for clarity, providing accurate visual representations of the building’s exterior and interior elevations.
Creating Realistic Renderings of Architectural Models
Realistic renderings are crucial for conveying design intent and obtaining client approval. While SketchUp itself offers basic rendering capabilities, leveraging extensions such as V-Ray or Thea Render significantly enhances the quality and realism of your output. These extensions allow for detailed material assignments, lighting simulations, and atmospheric effects, producing photorealistic images. For example, using V-Ray, you could accurately simulate the reflection of sunlight on glass windows or the texture of a brick wall, adding a significant level of visual fidelity to your renderings.
Experimentation with different rendering engines and settings will allow for the creation of images that effectively communicate the design.
Modeling Complex Architectural Details
SketchUp’s strength lies in its ability to model complex architectural details. This involves using a combination of tools and techniques to create intricate elements. For instance, to model ornate cornices, one could use the follow me tool to extrude a profile along a path, creating a three-dimensional representation. Similarly, detailed window frames and intricate molding can be created using a combination of the push/pull tool, the offset tool, and the move tool, allowing for precise control over the shape and form of the details.
The use of groups and components is crucial for managing complexity and ensuring consistency across multiple instances of the same detail. Careful planning and a methodical approach are key to successfully modeling complex elements.
Creating a 3D Model of a School
To create a 3D model of a school, begin by establishing the overall dimensions and layout of the building. Start with the main building footprint, using the rectangle tool to create the base. Then, use the push/pull tool to add walls and define the different rooms, including classrooms, offices, and common areas. Employ components to create and duplicate classrooms, reducing modeling time and ensuring consistency.
Next, add architectural details such as windows, doors, and roofing, paying attention to scale and proportion. Finally, consider adding landscaping elements and surrounding structures to complete the model. This approach provides a structured method for creating a detailed and accurate representation of a school building within SketchUp.
SketchUp for Product Design
SketchUp’s intuitive interface and powerful modeling tools make it a surprisingly versatile platform for product design, from initial concept sketches to detailed production-ready models. Its ease of use allows designers to quickly iterate on designs and explore different possibilities, while its extensibility through plugins allows for advanced rendering and analysis. This makes it a popular choice for designers of all levels, from hobbyists to professionals.Product design in SketchUp involves a workflow that seamlessly integrates modeling, rendering, and prototyping.
The software facilitates the creation of realistic 3D models that can be used to communicate design ideas to clients, manufacturers, and other stakeholders. Moreover, its capacity for creating photorealistic renders enhances the presentation of designs and allows for effective visualization of the final product.
Examples of SketchUp in Product Design
SketchUp finds application across a vast range of product design fields. Imagine a furniture designer crafting a detailed model of a new sofa, complete with intricate stitching and fabric textures. Or consider an industrial designer meticulously modeling the components of a complex piece of machinery, ensuring all parts fit together precisely. Even a jewelry designer might use SketchUp to create a highly detailed model of a new ring, complete with gemstone settings.
These examples highlight the adaptability of SketchUp to different scales and levels of complexity. The software’s flexibility makes it suitable for everything from small consumer goods to large-scale industrial equipment.
Creating 3D Product Models in SketchUp
The process typically begins with a basic shape, often a simple box or cylinder, representing the overall form of the product. From this foundation, the designer uses SketchUp’s tools to add details, such as curves, edges, and features. The “Push/Pull” tool is particularly useful for creating three-dimensional forms from two-dimensional shapes. Components are frequently used to organize parts of the model, making it easier to manage complex assemblies.
Precise dimensions are crucial, and SketchUp allows for detailed measurements and constraints to ensure accuracy. This iterative process of adding and refining details continues until a complete and accurate 3D model is achieved.
Creating Detailed Product Renders in SketchUp
While SketchUp’s default rendering capabilities are adequate for basic visualizations, plugins like V-Ray or Thea Render significantly enhance the quality and realism of renders. These plugins allow for the creation of photorealistic images that accurately depict materials, lighting, and shadows. The use of textures and materials is key; applying realistic wood grain, metallic sheen, or fabric patterns significantly increases the visual impact.
Careful lighting setup, including ambient, directional, and point lights, is crucial for creating a believable atmosphere and highlighting the product’s features. Finally, post-processing techniques, such as adjusting color balance and contrast, can further enhance the final render. A well-rendered image can effectively convey the design’s aesthetic appeal and functional details.
SketchUp for Prototyping and Design Iteration
SketchUp’s ability to quickly generate and modify 3D models is invaluable for prototyping and design iteration. Designers can easily experiment with different shapes, sizes, and features, quickly evaluating the impact of each change. The software allows for the creation of multiple design variations, which can then be compared and analyzed. This iterative process helps designers refine their designs, addressing potential issues and optimizing functionality before committing to physical prototypes.
This rapid prototyping capability significantly reduces development time and costs, making it a highly efficient tool in the product design workflow.
Design of a Simple Product: A Modern Desk Lamp
Imagine a simple desk lamp with a cylindrical base and a flexible arm ending in a circular lampshade. In SketchUp, you’d start by drawing a circle for the base, then use the “Push/Pull” tool to extrude it into a cylinder. Next, you’d create a curved arm using the “Follow Me” tool, potentially incorporating a series of carefully placed control points to achieve the desired flexibility.
Finally, you’d model the lampshade as another cylinder, potentially adding details like a textured surface. The entire assembly could then be rendered using appropriate materials and lighting to create a realistic representation of the final product. The ability to easily modify the arm’s curvature, the base’s size, and the lampshade’s design allows for quick experimentation and iteration within the design process.
SketchUp for Interior Design: Sketch Up
SketchUp’s intuitive interface and powerful modeling tools make it a fantastic choice for interior designers. From initial conceptualization to detailed visualizations, SketchUp allows for efficient workflow and stunning presentations to clients. Its flexibility allows designers to experiment with different layouts, materials, and lighting schemes with relative ease, ultimately leading to more informed and creative design decisions.
Creating a 3D Model of an Interior Space
Modeling an interior space in SketchUp begins with establishing the basic shell. This involves drawing the walls, floor, and ceiling using the rectangle and push/pull tools. Precise measurements are crucial here, ensuring accuracy in scale and proportion. Once the basic structure is in place, you can start adding details like windows, doors, and architectural features using similar tools, always remembering to maintain accurate dimensions.
Remember to use layers to organize your model efficiently, separating elements like walls, floors, and furniture into distinct layers for easier management and modification. This structured approach ensures a clean and manageable model, especially as complexity increases.
Modeling Furniture and Other Interior Elements
Modeling furniture and other interior elements can be approached in several ways. Simple pieces can be created using basic shapes like boxes and cylinders, then refined with the push/pull and other editing tools. For more complex pieces, you might import 3D models from online repositories or create them from scratch using more advanced techniques like component creation. Components are reusable elements that can be easily duplicated and modified, saving time and ensuring consistency throughout the model.
For example, a sofa could be created as a component, allowing you to easily add multiple sofas to different rooms with minimal effort. The use of groups and components also streamlines the editing process, allowing for quick adjustments without disrupting the rest of the model.
Creating Realistic Interior Renderings
Realistic interior renderings are crucial for effectively communicating design ideas. SketchUp itself offers basic rendering capabilities, but for professional-quality results, you’ll likely want to utilize plugins like V-Ray or Thea Render. These plugins offer advanced features like realistic lighting, materials, and shadows, significantly enhancing the visual impact of your designs. Experimenting with different lighting setups is key to achieving the desired mood and atmosphere.
Careful selection of materials, paying close attention to texture and reflectivity, is also essential for creating a sense of realism. For instance, using a highly reflective material for a polished floor will dramatically change the overall look and feel of the rendering compared to a matte finish.
Visualizing Different Design Options
SketchUp’s ability to quickly iterate on design options is a significant advantage. You can easily experiment with different furniture arrangements, wall colors, and lighting schemes without needing to start from scratch each time. This allows for rapid prototyping and exploration of various design directions. For example, you can easily move a piece of furniture to a different location to see how it affects the overall flow of the space, or change the color of a wall to see how it impacts the mood of the room.
This iterative process is critical in interior design, enabling designers to quickly evaluate and refine their ideas.
Interior Design Mood Board
Imagine a mood board featuring a deep teal accent wall, contrasted by the warm, natural tones of light oak flooring. A plush, velvet emerald green sofa anchors the living space, accompanied by a sleek, minimalist coffee table made of polished concrete. Subtle, indirect lighting is provided by recessed fixtures and a floor lamp with a linen shade, casting a soft glow across the room.
The overall style evokes a feeling of sophisticated comfort, a blend of modern minimalism and classic elegance. The color palette is carefully curated to create a calming and inviting atmosphere, emphasizing a sense of tranquility and refined taste.
SketchUp’s Rendering Capabilities
SketchUp’s rendering capabilities have evolved significantly, offering users a range of options from simple styles to photorealistic images, depending on their needs and technical skills. Understanding these options and mastering the rendering process is key to creating compelling visuals for presentations, client approvals, and portfolio pieces. This section will explore the different rendering methods available within SketchUp and provide a practical guide to achieving high-quality results.
Rendering Options in SketchUp
SketchUp offers several built-in rendering styles, along with the ability to integrate with external rendering engines for advanced capabilities. The built-in options range from simple line drawings to more sophisticated styles that simulate materials and lighting. These styles provide a quick and easy way to visualize a model, perfect for early-stage design exploration. For more advanced rendering, plugins like V-Ray, Thea Render, and Enscape offer photorealistic results, handling complex lighting, reflections, and shadows with greater precision.
The choice of rendering method often depends on the project’s complexity, the desired level of realism, and the user’s familiarity with different software. Many users find a workflow that incorporates both built-in styles for quick iterations and a powerful plugin for final renderings to be the most efficient.
Creating High-Quality Renderings
Producing a high-quality rendering involves careful consideration of several factors. Accurate modeling is fundamental; details like precise geometry and well-defined materials directly impact the final image’s quality. Effective lighting is crucial for establishing mood and highlighting key features. Experimentation with different light sources – such as sunlight, point lights, and area lights – is essential. The placement and intensity of these lights significantly influence the overall look and feel of the rendering.
Finally, the selection and application of materials are vital for achieving realism. Using high-resolution textures and carefully adjusting material properties such as reflectivity and roughness significantly enhance the visual appeal. Post-processing techniques, often done in external image editing software, can further enhance the final image, allowing for adjustments to color balance, contrast, and sharpness.
Comparison of Rendering Techniques
A simple SketchUp style render, using the built-in rendering engine, might produce a clean, clear image suitable for quick visualizations or presentations where photorealism isn’t critical. The lines are crisp, the colors are flat, and the overall aesthetic is simple and uncluttered. In contrast, a rendering created using a plugin like V-Ray or Enscape would demonstrate significantly enhanced realism.
These plugins handle global illumination, caustics, and subsurface scattering, resulting in images that accurately simulate light interactions with materials. Shadows are softer, reflections are more accurate, and the overall image possesses a depth and richness absent in simpler renderings. The increased realism comes at the cost of significantly longer rendering times and a steeper learning curve for the software.
Exporting Renderings for Print or Web Use
Once a rendering is complete, exporting it in the correct format is crucial. For print, a high-resolution image (e.g., TIFF or PNG) with a resolution of at least 300 DPI is recommended to ensure crisp details. For web use, a smaller file size is preferable to ensure fast loading times. JPEG is a common choice for web use due to its smaller file size and good image quality.
The specific dimensions will depend on the intended use, but it’s advisable to export at a resolution suitable for the target platform (e.g., social media, website). Consider compressing the image without significant loss of quality for web use to minimize file size.
Creating a Photorealistic Rendering of a Simple Model
Let’s create a photorealistic rendering of a simple cube. First, model a cube in SketchUp. Apply a realistic material, perhaps a wood texture, to the cube’s faces. Next, add light sources; a key light, a fill light, and a back light will add depth and dimension. Experiment with the intensity and placement of these lights to achieve a desirable effect.
For a plugin render (using a hypothetical plugin called “AwesomeRender”), select the “AwesomeRender” option from the menu. Choose high-quality settings within the plugin’s interface, including appropriate sampling and ray tracing options. Let the render process complete; this can take time depending on the model’s complexity and the rendering settings. Once finished, export the image as a high-resolution TIFF file for print or a compressed JPEG for web use.
Finally, consider using image editing software to make any minor adjustments to color or contrast.
SketchUp File Management and Collaboration
So, you’ve modeled your dream house, designed the next killer gadget, or meticulously crafted an interior space. Now what? Managing your SketchUp files and collaborating with others is crucial to keeping your projects organized and your sanity intact. Let’s dive into the world of SketchUp file management and teamwork.
SketchUp File Formats
SketchUp primarily uses the `.skp` file format, which stores the entire model, including geometry, materials, and components. This is your primary working file. However, you can also export your models in various other formats depending on your needs. These include formats suitable for other CAD software, image files for presentations, and 3D print-ready files. Understanding these options is key to effective file management.
Organizing and Managing Large SketchUp Projects
Working with large, complex models can quickly become unwieldy. Effective organization is key. Think of it like building a house: you wouldn’t just throw all the materials into a pile, would you? Similarly, break down your project into manageable components, saving each as a separate `.skp` file. Use a clear naming convention (e.g., “House_Model_Kitchen.skp,” “House_Model_LivingRoom.skp”).
Consider using a folder structure to organize these components logically. For extremely large projects, employing techniques like layering and components is crucial for performance and organization. This allows you to easily manage and turn on or off different parts of your model without affecting performance.
Collaborating on SketchUp Projects
Collaborating on a SketchUp project usually involves using a version control system or a cloud-based storage service. Version control systems like Git (often used in conjunction with a platform like GitHub or GitLab) allow multiple users to work on the same project simultaneously, tracking changes and merging updates effectively. Cloud storage services such as Google Drive or Dropbox allow for easy sharing and access, but lack the version control features of dedicated systems.
For simpler collaborations, exporting to a common file format (like `.dae` or `.fbx`) that other software can open can also be a viable option. However, this sacrifices the ability to directly edit the model within SketchUp. Clearly defined roles and communication are essential regardless of the chosen collaboration method.
Version Control Best Practices in SketchUp
Version control isn’t just about preventing accidental overwrites; it’s about preserving a history of your design process. Regularly saving your work is paramount, but a dedicated version control system provides a much more robust solution. Consider using a system that allows for branching (creating parallel versions of your model to explore different design options), merging (combining changes from different branches), and reverting to previous versions if necessary.
Remember to commit changes frequently with descriptive messages outlining the modifications made. This allows you to easily track the evolution of your design.
Comparison of SketchUp File Formats
| File Format | Pros | Cons | Best Use Case |
|---|---|---|---|
| .skp | Preserves all SketchUp data; allows for easy editing | Large file size; not universally compatible | Primary SketchUp working file; internal collaboration |
| .dae (COLLADA) | Widely compatible with other 3D software | May lose some SketchUp-specific data | Sharing models with users of other 3D applications |
| .fbx (Autodesk FBX) | Good compatibility; supports animation and textures | Can be large; potential for data loss depending on settings | Sharing models for animation, rendering, or game development |
| .3ds (3D Studio) | Widely supported; relatively small file size | Limited data preservation; may lose materials and textures | Sharing simple models with older software or for quick visualization |
Advanced SketchUp Techniques
Okay, so you’ve mastered the basics of SketchUp – congrats! Now let’s dive into some seriously powerful techniques that will elevate your models from simple shapes to complex, polished creations. We’ll explore component and group management, advanced modeling strategies, organizational tools, material creation, and finally, build a complex model to showcase these skills.
Components and Groups
Components and groups are fundamental for efficient modeling in SketchUp. Groups simply bundle geometry together, allowing for edits to the entire group at once. Components, however, are far more powerful. They act as instances of a single definition; editing one component updates all instances simultaneously. This is incredibly useful for repetitive elements like furniture, windows, or even entire building modules.
For example, if you’re designing a row of houses, creating a component for a single house allows you to quickly duplicate and arrange them, making adjustments to the component instantly reflected in all houses. This drastically reduces file size and streamlines the editing process. The key difference lies in the ability to update all instances of a component simultaneously, whereas group edits are confined to the individual group.
Advanced Modeling Techniques: Curves and Surfaces, Sketch up
Moving beyond basic shapes requires mastering curves and surfaces. SketchUp offers several tools for creating these, including the Follow Me tool, which extrudes a profile along a path, and the Curve tool, which lets you create smooth, flowing curves. These are crucial for organic modeling, architectural flourishes, and product design. Imagine designing a sleek, curved sofa. The Follow Me tool would allow you to create the curved body by extruding a cross-section along a curved path.
Combining curves and surfaces with the Push/Pull tool opens up a world of complex forms and shapes. Consider a car’s body – a masterclass in manipulating curves and surfaces to create a flowing, aerodynamic design.
Layers and Tags for Model Organization
Large, complex models quickly become unwieldy without a robust organizational system. SketchUp’s layers and tags provide this structure. Layers allow you to isolate and hide different parts of your model, simplifying navigation and editing. Tags, on the other hand, assign metadata to specific geometry, facilitating selection and filtering. For instance, you might use layers to separate structural elements from landscaping, and tags to categorize elements by material (e.g., “wood,” “concrete,” “glass”).
Effectively using both layers and tags is key to managing a project with hundreds or even thousands of individual components. Think of designing a skyscraper: layers would manage different floors and systems, while tags could categorize materials for accurate material take-offs.
Creating Custom Materials and Textures
SketchUp’s rendering capabilities are significantly enhanced by custom materials and textures. You can create realistic materials by adjusting color, reflectivity, roughness, and other properties. Importantly, you can also apply images as textures to add detail and realism. For example, you could create a custom wood texture by importing a high-resolution image of wood grain. This significantly boosts the visual appeal of your models, moving them beyond simple colored surfaces to highly realistic representations.
Consider the difference between a plain red brick wall and one textured with a high-resolution photo of real brickwork – the detail is night and day.
Creating a Complex Model: A Case Study
Let’s consider building a detailed model of a modern house. We would start by creating components for recurring elements like windows, doors, and roof sections. We’d use layers to separate the foundation, walls, roof, and landscaping. Tags would categorize materials such as wood siding, concrete flooring, and glass windows. Advanced modeling techniques like the Follow Me tool would be used to create curved rooflines or balconies.
Custom materials and textures would add realism to the siding, roofing, and landscaping. This process demonstrates how the previously discussed techniques integrate to create a sophisticated, organized, and visually appealing model. The end result is a highly detailed model that is both visually impressive and easy to manage and modify.
SketchUp and Other Software Integration
SketchUp’s power isn’t just in its modeling capabilities; it truly shines when integrated with other design software. This interoperability expands its functionality, allowing for more complex projects and streamlined workflows. Effectively leveraging this integration is key to maximizing SketchUp’s potential.
The ability to seamlessly exchange data with other applications is a crucial aspect of modern design. This allows designers to focus on their strengths within specific software, utilizing the best tools for each stage of a project. This process involves importing and exporting models, often in various file formats, and understanding the strengths and weaknesses of each integration method.
Software Integration with SketchUp
SketchUp integrates well with a wide range of software, depending on the specific design discipline. For architectural visualization, common partners include rendering engines like V-Ray and Lumion, and BIM software like Revit and ArchiCAD. In product design, applications like Keyshot for rendering and SolidWorks or Fusion 360 for CAD modeling are frequent collaborators. For interior design, applications like Photoshop for texture creation and Illustrator for 2D plans are frequently used.
This interoperability allows for a robust and versatile design process.
Importing and Exporting Models
The process of importing and exporting models typically involves selecting the appropriate file format (like .skp for SketchUp, .fbx for interchange, .dae for COLLADA, or various CAD formats) and then using the import/export functions within each software package. It’s crucial to understand that some detail might be lost during conversion, especially when moving between vastly different software architectures. For example, converting a highly detailed SketchUp model to a simpler CAD format might result in a loss of fine details.
Conversely, importing a highly complex CAD model into SketchUp might require simplification for optimal performance. Careful consideration of the file format and its compatibility is essential to ensure a smooth transfer.
Benefits of SketchUp Integration
Integrating SketchUp with other design tools offers several key benefits. It allows for specialized tasks to be handled by the most suitable application. For instance, complex photorealistic rendering is best left to dedicated rendering engines like V-Ray or Lumion, while SketchUp excels at the initial modeling and design phases. This division of labor leads to increased efficiency and improved quality.
Furthermore, collaboration is significantly enhanced, as different team members can work on their specialized parts using their preferred software. Finally, it facilitates a more comprehensive design process, incorporating elements that might be difficult or impossible to achieve within SketchUp alone.
Examples of Multi-Software Workflows
Consider an architectural project. A designer might begin by creating a basic model in SketchUp, then export it to Revit for detailed BIM modeling and structural analysis. Afterward, the model is imported into Lumion for high-quality rendering and animation, and finally, the final images are touched up in Photoshop. Similarly, in product design, a designer could model a product in SketchUp, export it to SolidWorks for detailed engineering analysis, and then render it in Keyshot for marketing materials.
SketchUp’s awesome for visualizing store layouts, right? But once you’ve got that perfect design, you need a killer point of sale system to actually run your business, like the ones you can check out at point of sale systems. Then, you can use SketchUp again to model how your POS system will look in the space – total design win!
These examples highlight the power of a multi-software approach.
Comparison of Integration Methods
Different integration methods have varying strengths and weaknesses. Direct file exchange, using formats like .fbx or .dae, offers a relatively simple workflow but can sometimes result in data loss. Plugins and extensions provide tighter integration, often preserving more detail, but might require additional software or configurations. APIs (Application Programming Interfaces) offer the most robust integration, allowing for complete control and automation, but are typically more complex to implement.
The best method depends on the specific needs of the project and the user’s technical expertise.
SketchUp Learning Resources and Community

So, you’re ready to dive into the world of SketchUp? Awesome! Learning this powerful 3D modeling software doesn’t have to be a solo mission. There’s a wealth of resources and a supportive community waiting to help you along the way, from beginner to pro. This section will point you towards the best places to start learning and connect with other SketchUp users.Learning SketchUp effectively hinges on utilizing both structured learning and community support.
Structured learning provides the foundational knowledge, while community engagement offers practical tips, troubleshooting assistance, and inspiration from others’ projects. The combination of these approaches accelerates learning and fosters a deeper understanding of SketchUp’s capabilities.
Reputable Online Resources for Learning SketchUp
Several platforms offer high-quality SketchUp tutorials and courses. These resources cater to various learning styles and skill levels, ensuring a suitable learning path for everyone. Many offer free introductory content, allowing users to explore the software before committing to paid courses. Paid courses often provide more in-depth instruction, personalized feedback, and structured learning paths.
Benefits of Participating in the SketchUp Community
Engaging with the SketchUp community provides invaluable benefits beyond formal instruction. The collective knowledge and experience of the community offer solutions to challenges you might encounter, accelerate your learning through peer-to-peer interaction, and provide opportunities for collaboration on projects. The sense of community can also boost motivation and provide inspiration as you see what others are creating. Active participation, such as answering questions, sharing your work, and contributing to discussions, further strengthens the community and benefits both yourself and others.
Finding Help and Support When Using SketchUp
When you hit a snag, remember you’re not alone. The SketchUp community offers numerous avenues for seeking assistance. Online forums are a great place to post questions and receive help from experienced users. The SketchUp website itself often provides comprehensive documentation and troubleshooting guides. Additionally, many third-party websites and YouTube channels offer tutorials and solutions to common SketchUp problems.
Remember to clearly describe your issue, including screenshots if possible, to facilitate quick and accurate assistance.
Useful SketchUp Tutorials and Courses
The availability of SketchUp tutorials and courses is vast and constantly evolving. Many are free and readily available on YouTube, while others are offered through online learning platforms like Udemy and Skillshare. These platforms often have reviews and ratings, allowing you to choose courses based on others’ experiences. SketchUp’s official website also offers tutorials and documentation. Look for courses that cover the specific aspects of SketchUp that interest you, whether it’s architectural modeling, product design, or interior design.
For example, a course focused on “Advanced SketchUp Techniques for Architectural Visualization” would differ greatly from a course on “SketchUp for Beginners: Modeling Simple Shapes.”
Online Forums and Communities Dedicated to SketchUp
The SketchUp community thrives online through various forums and platforms.
- The SketchUp Forums: The official SketchUp forum is a central hub for discussions, questions, and support. It’s moderated by Trimble staff and active community members.
- Reddit’s r/SketchUp: This subreddit provides a lively space for users to share projects, ask for help, and discuss SketchUp-related topics.
- Various Facebook Groups: Numerous Facebook groups are dedicated to SketchUp, offering a more casual and interactive environment for users to connect and share their work.
Wrap-Up
So there you have it – a whirlwind tour through the exciting world of SketchUp! From its user-friendly interface to its powerful extensions and diverse applications, SketchUp empowers designers and creators of all levels. Whether you’re a seasoned pro or just starting out, remember that the key to mastering SketchUp lies in consistent practice and exploration. Don’t be afraid to experiment, push your creative boundaries, and most importantly, have fun building amazing things! Now go forth and create!
Commonly Asked Questions
What’s the difference between SketchUp Free and SketchUp Pro?
SketchUp Free is a web-based, limited version, great for basic modeling. SketchUp Pro offers more advanced features, extensions support, and offline access.
Is SketchUp hard to learn?
Nah, it’s pretty intuitive. The learning curve is gentle, especially compared to other 3D modeling software. Plenty of tutorials are available online to help you get started.
What kind of computer do I need to run SketchUp?
You’ll need a reasonably modern computer with decent RAM and graphics capabilities. SketchUp’s system requirements are readily available on their website.
Can I import models from other software into SketchUp?
Totally! SketchUp supports a variety of file formats, making it easy to integrate with other design programs. Expect some minor tweaking might be needed sometimes.
Where can I find help if I get stuck?
The SketchUp community is super helpful! Check out their forums, online tutorials, and YouTube channels for answers and support. There’s a ton of resources out there.